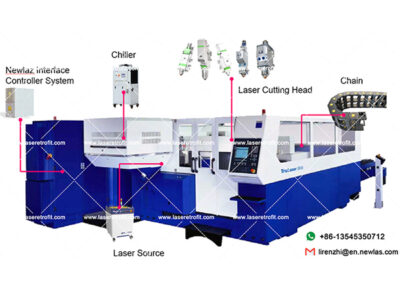
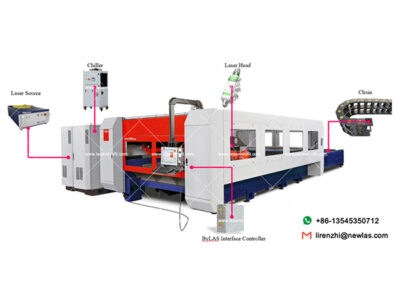
As one of the main parts of the laser cutting machine, the laser head is in direct contact with the material, so the quality of the laser head and daily maintenance will directly affect the cutting effect of the material.
1. Well Sealed
Check whether the light comes out from the center of the nozzle before cutting every day.
Put the scotch tape on the nozzle of the laser head and click the burst button on the remote control. Remove the tape and check the mark on the tape. If the light does not come out from the center of the nozzle, please adjust the dimming again. Here is the right mark on the tape.
2. Check The Protective Lens On The Laser Cutting Head
Check whether the protective lens is clean every day before cutting. Otherwise, please clean the protective lens with isopropanol or analytical alcohol (alcohol purity above 99.5%) without leaving water marks.
The process of removing and installing the protective lens:
- Open the protective lens cover, pinch both sides of the drawer-type lens holder and pull out the protective lens holder as shown in the figure below;
- Remove the pressure ring of the protective lens, put on the finger cot, and take out the lens;
- Clean the lens, lens holder, and sealing ring. If the spring sealing ring is damaged, replace it with a new one;
- Install the cleaned new lens (regardless of front and back) into the drawer type lens holder;
- Reinstall the protective lens pressure ring;
- Reinsert the protective lens holder back into the laser processing head and close the protective lens cover.

Due to the characteristics of the laser cutting process, the lens needs to be maintained regularly. It is recommended that the protective lens be cleaned once a week. In order to facilitate the maintenance of the protective lens, the protective lens holder adopts a drawer structure. The protective lens is a vulnerable part and needs to be replaced when damaged.
Tools needed for lens cleaning: dustproof gloves, finger cots, long-fiber absorbent cotton swabs, ethanol, rubber air blower.
The cleaning method is below:
- Spray ethanol on the absorbent cotton swab.
- Gently pinch the side edge of the lens with the thumb and index finger of the left hand. (Note that your fingers should not touch the surface of the lens to avoid leaving trace)
- The lens is facing the eyes, the right-hand holds the absorbent cotton swab, and gently wipe the lens from bottom to top or from left to right in a single direction(avoid wiping back and forth to avoid secondary pollution of the lens), and blow the surface of the lens with air.Don’t forget to clean both sides.
- fter cleaning, reconfirm that there can be no residues of the following: detergent, absorbent cotton, foreign matter, impurities.
3. Check Nozzle
Before each cutting, check whether the nozzle is clean and is a complete circle, and clean the nozzle.
4. Check Laser Cutting Head
Check the ceramic ring, SMA cable, and preamplifier every day for looseness and foreign matter. Please tighten and clean.