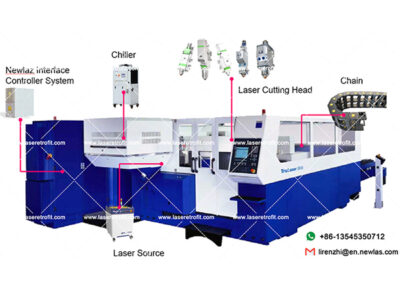
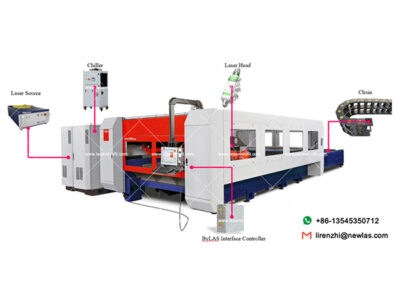
The laser cutting head is one of the core parts of the fiber laser cutting machine. The maintenance of the cutting head directly affects the processing quality and the efficiency of the fiber laser cutting machine.
The daily maintenance is simple, less time-consuming and low cost. It can not only reduce the failure rate, reduce the wear of components, but also extend the service life of the equipment. The better the daily maintenance, the more stable the performance of the equipment and the longer the service life.
Cleaning Lens
It’s necessary to maintain lenses regularly because of the characteristics of the laser cutting process. Once a week cleaning the protective lens is recommended. The collimating lens and focusing lens need to be cleaned once every 2~3 month. In order to facilitate the maintenance of the protective lens, the protective lens mount adopts a drawer type structure.

Tools: Dust-proof gloves or finger sleeves, polyester fibers cotton stick, ethanol, rubber gas blowing.
Cleaning instruction:
- The left thumb and forefinger wear the finger sleeves;
- Spray ethanol onto the polyester fibers cotton stick;
- Hold the slide edge of the lens with your left thumb and forefinger gently.(note: avoid the fingertip touching the surface of the lens)
- Put the lens in front of your eyes, hold the polyester fibers cotton stick with the right hand. Wipe the lens gently in a single direction, from bottom to top or from left to right, ( Should not be able to wipe back and forth, to avoid secondary lens pollution)and use rubber gas blowing to sway the surface of the lens. Both sides should be cleaned. After cleaning, make sure that there are no residues: detergent, absorbent cotton, foreign matter and impurities.
Remove and Install Protective Lens
The procedure is as following:
- The whole process need to be completed in a clean place. Wear dust-proof gloves or finger sleeves when removing or installing the lenses.
- The protective lens is a fragile part and needs to be replaced after damage.
- Loosen two locking screws, hold the two sides of the drawer type lens mount and pull out the protective lens mount.
- Remove the pressure ring of the protective lens, remove the lens after wearing finger sleeves.
- Clean the lens, lens mount and sealing ring. The elastic sealing ring should be replaced if damaged.
- Install the new cleaned lens (Regardless of the front or back side) into the drawer type lens mount.
- Put the pressure ring of the protective lens back.
- Insert the protective lens mount back to the laser cutting head and tighten the locking screws.
Note: Do not directly pull the edge of the elastic sealing ring out so that it is easy to damage.

Remove and Install Collimating Lens
You can check the procedures as following:
- Remove the laser head and move to a clean place. Clean all dust on the laser head surface;
- Use a 3mm inner hexagon spanner to loosen the screws of collimating components( as shown in figure 1), and seal the part(connected to collimating components) with Crepe Paper to prevent dust from falling inside the laser head.
- Unscrew the collimating lens mount and remove the spring pressure ring and the collimating lens with the lens removing tool;
- Clean or replace the collimating lens.
- As shown in figure 2, reassemble the collimating lens components in sequence. Note that the spring pressure ring is tightened properly and re-screwed into the collimating component.
- Tighten the locking screws of collimating components.
- Check if the focus position is at the center of the nozzle or not before using, if not , the position should be reset.

Remove and Install the Focusing Lens
1. The procedures is below for your reference:
- Remove the laser head and move to a clean place. Clean all dust on the laser head surface.
- Place the laser head horizontally., remove the locking screws from bottom to top.
Remove the spring pressure ring and focusing lens with a lens removing tool. - Replace or clean the focusing lens.
- Put the focusing lens and the spring pressure ring in the lens mount carefully and tighten the pressure ring properly.
2. Turn the focusing lens back into the focusing lens mount and tighten it.
3. Reassemble and tighten the screws.
4. Check the focus position is at the center of nozzle or not.